
How to Replace the Quick Connectors with Elbow Connectors on Irrigation Hoses
Need to install the elbow connectors that you recently received? We've got you covered! Follow the steps below for improved watering in no time.
Check if your device has a leakage
The first thing you will want to do is manually engage the pump by tapping on the water tile from the home screen of the Gardyn app.
Remove the bottom yPod from each column and check if there is any visible leaking from the connections between the hoses from the lid and the hoses from the columns. Below is a video demonstrating what the leak would look like:
If you observe leaking from the irrigation connector, we suggest you switch the quick connect to the 90-degree elbow connectors.
To get started, you'll need a towel, a tray or countertop to place all of your plants, and a Phillips head screwdriver if you have a Gardyn Home 1-2.
Part 1: Prepare your Gardyn
Turn off your Gardyn and unplug the power supply from both your Gardyn's lid and the outlet.
Remove all of your plants in their yPods along with any Gardyn Caps and place them on a tray or clean countertop. (You may choose to do this entire process one column at a time if you prefer.)
Depending on your model, unplug or unscrew the back of the upper blades from the top of the columns along with the metal plates and metal bar.
Part 2: Disassemble the columns (can do one at a time)
Remove the columns by twisting each column's lowest module and lifting slightly, then detaching the irrigation hose connector to fully lift and remove the column.
Remove both blue c-clips on the quick connector and set aside.
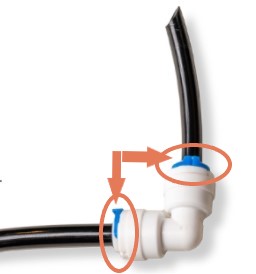
Press on the top of the connector's white plastic to release the irrigation hose, as shown below:
Part 3: Install the elbow connectors
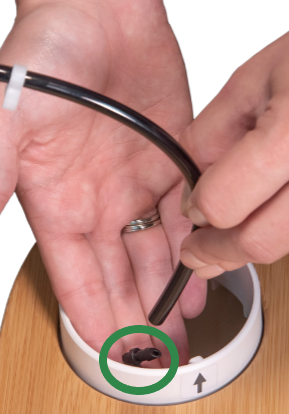
First, install the connector to the irrigation hose that is inside the lid, as shown below:
Take the irrigation hose from the column you removed and attach it to the irrigation connector inside the lid, just like during your original assembly:
With the connector installed, place the column back onto your Gardyn's lid and lock it into place by rotating it clockwise.
Repeat with the other columns.
When all columns are done, return the metal bar, metal plates, and upper blades to secure your Gardyn's upper structure.
Questions? Reach us at support@mygardyn.com, or chat with us. We're here to help!