
Treating Pests: Aphids
Pests are a natural part of Gardyning. Despite your best prevention efforts, pests can happen, but it’s okay! If you or Kelby have identified aphids on your Gardyn, keep reading for our recommended treatment plan.
Not sure you have aphids? Review our pest identification guide here, or take our pest ID quiz!

What it Means to Treat Aphids
Treating any pest requires diligent and consistent efforts! Treatment includes handling all of your plants every few days to remove the aphids in a sink rinse plus a dunk in a bucket of soap solution to remove the pest population over time. Expect 6 steps that in total take about 3 hours of active time spread over 16 days.
Pros & Cons of Treating Aphids
Pros: You get to keep your plants, learn about your pest’s life cycle (so you understand how treatment interrupts it), become an IPM pro
Cons: More time and effort than starting fresh, chance you’ll still lose some plants along the way, getting up close and personal with aphids (or maybe that’s a pro for you - we won’t judge)
Choose a Plan that Works for You
Keep reading for the treatment plan. If at any point during treatment you decide you'd like to start fresh instead and end your treatment regimen, feel free to do so!
Materials Needed to Treat Aphids:
Baking soda, sponge, citric acid/hydrogen peroxide/vinegar, large bowl/bucket or spray bottle, bottle brush, patience, determination
⚠️ Safety Reminder:
When using citric acid to clean your Gardyn, always wear gloves to protect your skin. Citric acid is a natural but strong acid that can cause irritation with direct contact. Avoid contact with your eyes and skin, and wash your hands thoroughly after handling.
Aphids Treatment Plan
Step 1 of 6: Remove, Harvest, & Trim
By limiting the amount of tasty plants on your Gardyn, you start to restrict the aphids’ habitat.
Needed materials: An outdoor compost or trash bag you can take outside, scissors, sink
Estimated time to complete task: 30 minutes active time
Dispose of the most infested plantsYou can either compost these plants outside, take them out in the trash ASAP, or transplant them outside weather-permitting. Fewer plants means more airflow and fewer hiding spots for pests (+ less work for you in later steps!).
Harvest as much as you canOf the plants you keep, harvest as much as possible. Consider harvesting in full plants nearing the end of their life cycle so you can remove their yCubes.
Trim heavily infested areasRemove leaves and branches with the most pests visible on them, or heavy signs of their damage, to further reduce the pest population, increase air flow, and provide fewer hiding spots.
4. Prep for your first dunk
Your next task involves Castile soap, which cannot be substituted with dish soap, hand soap, or any other kind of household detergent. Castile soap is easy to find online and in many grocery stores! While you wait, you can rinse your plants in the sink to knock off many aphids.
Steps 2-5 of 6: Castile Soap Dunks
While rinsing removes many adult aphids, only a dunk in Castile soap in set intervals dries up eggs & adults. Repeat this step every 4 days until you've completed a total of 4 dunks.
Needed materials: Castile soap, a large bowl or bucket, a Tablespoon measure, and a towel to cover your Gardyn’s lid
Estimated time to complete task: 30 minutes active time, 4 hours inactive time + 24 hours before you can harvest post-dunk
Prep your GardynTurn off your Gardyn’s lights and lay a towel over the wood lid. On the third time you do this task, re-trim any leaves or branches that are heavily infested with aphids.
Mix the Castile soap solutionUse 2.5 tablespoons of Castile soap per 1 gallon of warm (not hot!) water, and stir in a large bowl or bucket. We recommend creating a 4-gallon batch to ensure your larger plants can be fully immersed in the solution.
(Optional: Rinse plants in sink)
If you don’t mind more aphids in your bucket, feel free to skip this.
3. Dunk your plants one at a time
Don’t skip any plants, even if you don’t see pests! Dunk up to the rockwool, not beyond it. Watch the video to learn what to expect:
4. Return plants to your Gardyn
The towel over the lid will protect the wood from drips as your plants air dry. Keep your lights off for 4 hours to ensure your plants are totally dry, otherwise the light will burn them. Wait 24 hours before harvesting dunked plants, & rinse with water before eating.
Step 6 of 6: Scout for any signs of remaining aphids
It's time to see how your pests reacted to your treatment plan so you can decide your next steps.
Needed materials: Your eyes on your plants; depending on what you see, you may need baking soda, a sponge, new yCubes, and your yPods/Caps
Estimated time to complete task: 5-30 minutes active time
Scouting = Looking
Carefully look at all of your plants for pests or new signs of their damage. Look under leaves, on stems, near flowers, and on new growth. Do you see any aphids?
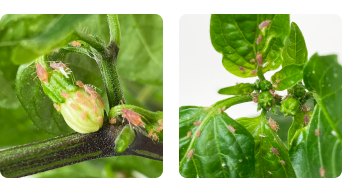
Aphids on plants; they’re most commonly green but can also be red, pink, yellow, white, grey, or black
Q: Do you see any aphids?
A: No aphids in sight!
Congrats, you’ve successfully treated your pest problem! You’re ready to do the following:
Clean your tank
Use baking soda and a sponge just like you would for a tank refresh.
Plan your next yCubes
Explore the app shop to discover something new, or find plant-spiration with our list here!
Reset your SOW Date
This lets Kelby place you back into Germination Mode so your new plants start getting watered. Set this date the day you add your new yCubes onto your Gardyn by going to your app's profile on the home screen.
Scout house plants for aphids
Your Gardyn isn’t the only temptation for aphids! Best check your houseplants now to see if any should be removed or treated before you start Gardyning again.
Assess your Gardyn's location
Keep in mind that open windows and doors, especially during warmer months, can increase the risk of pests finding your indoor Gardyn.
Set yourself up for success
Don’t forget to thin new seedlings, and do your best to keep up with tank top-offs and refreshes. Avoid an overgrown Gardyn by staggering when you start and add yCubes, and let Kelby handle your light and water schedules to ensure an optimal growing environment.
A: I see some aphids.
Okay, still pat yourself on the back for completing your initial treatment plan - it’s a lot! When aphids linger following a dunk treatment, you may choose to either start fresh or opt into a longer-term treatment plan by repeating the Castile soap dunks spread over more time.
If you choose to repeat treatment, follow the same steps as you did above, but dunk every 7-10 days instead of every 4.
What it means to start fresh
Starting fresh means getting rid of all of your plants and cleaning your Gardyn so you can begin germinating all new plants. Expect 3 steps that will take in total about 1.5 hours of active time and from 1 day up to 3 weeks of inactive time depending on whether you choose a dormant period after cleaning.
Pros & cons of starting fresh
Pros: Less time and effort than long-term aphids treatment, ability to choose all new plants, excitement of watching your whole Gardyn sprout at once
Cons: Saying farewell to all of your current plants, waiting for young plants to reach harvest stage
Materials needed to start fresh
Baking soda, sponge, new yCubes, citric acid/hydrogen peroxide/vinegar, large bowl/bucket or spray bottle, bottle brush, patience
⚠️ Safety Reminder:
When using citric acid to clean your Gardyn, always wear gloves to protect your skin. Avoid contact with your eyes and skin, and wash your hands thoroughly after handling.
What it means to treat aphids long-term
This treatment plan repeats the Castile soap dunks every 7-10 days instead of every 4. This route is designed to manage - not eliminate - the aphids while you let your plants live out their life cycles until you’re ready to start fresh. If you select the longer-term treatment, know you can opt-out any time by choosing to start over later. Expect at least 6 follow-up steps that will take in total roughly 3 hours of active time spread over about a month.
Pros & cons of treating aphids long-term
Pros: Keep and continue harvesting your plants while building a natural pest treatment method into your Gardyning routine
Cons: More time and effort than starting fresh, chance you’ll still lose some plants along the way, must rinse produce before consuming
Materials needed to continue treatment
Baking soda, sponge, citric acid/hydrogen peroxide/vinegar, large bowl/bucket or spray bottle, bottle brush, patience, determination
⚠️ Safety Reminder:
When using citric acid to clean your Gardyn, always wear gloves to protect your skin. Avoid contact with your eyes and skin, and wash your hands thoroughly after handling.
Questions? Reach us at support@mygardyn.com, or chat with us! We're here to help.